Instant Pot Sous Vide Cooking: Mouth-Watering Steak
I consider myself competent with a grill, and I’ve served up some pretty darn good steaks in my time. But I have never had a steak as good as the one I recently cooked sous vide in my Instant Pot Ultra. After that experience, sous vide is the only way I’ll ever cook steak – and most other cuts of meat – from now on!
What Is Sous Vide?
That’s a good question – I’m glad you asked! Sous vide is basically cooking food inside a sealed plastic or silicone bag in a controlled temperature water bath. And instead of torching your food, you cook it at a lower temperature and for a longer time than you would otherwise. The temperature of the water determines the done-ness of the food, and you don’t have to worry about overcooking it. Just as important, the food will be cooked uniformly all the way through, edge to edge!
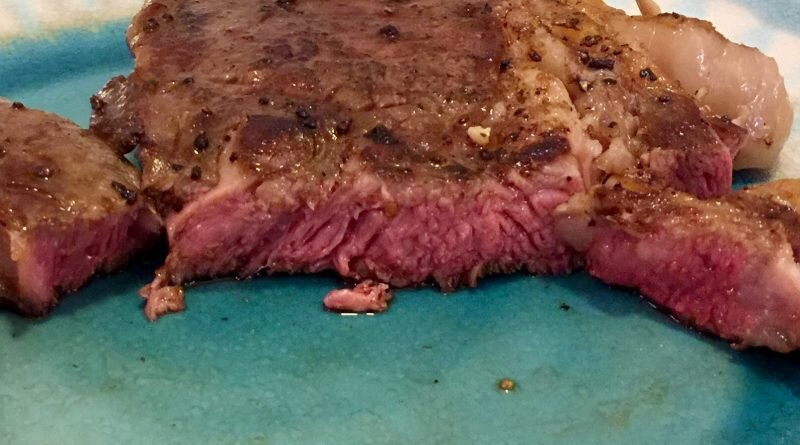
For example, a 1″ thick ribeye steak will be a perfect medium rare when cooked in water at 134F for one hour. But you never have to worry if you leave it in there more than that (up to 4 hours), because the meat is only going to get to 134F.
To finish a cut of meat like a steak, you remove it from the sous vide bath, take it out of its bag, and sear the sucker in a hot pan (I prefer a cast iron skillet) with some oil or butter for 30 to 60 seconds on each side, just enough to get a nice crust on it.
Note that many restaurants have been using this method of cooking for decades: this isn’t a new fad that’s suddenly hit the scene. Restaurants can prepare a number of steaks at different done-ness and keep them ready in their sous vide baths until an order comes in. Then they’re snatched from the bath, given a beautiful finish with some searing, and served to your table.
Sous Vide with the Instant Pot Ultra
I was thinking about getting a second Instant Pot, anyway (I already have a 6 Qt Duo), and had been thinking of giving the sous vide method a try. So when the Ultra came out, with a temperature control function that allowed sous vide cooking, I got one!
To get me started, I followed a video by ChefSteps to prepare the steak, seasoning it with salt, pepper, then sticking it into a ziploc freezer bag with a pat of butter and a couple of bay leaves (dry, in my case, as that’s what I’ve got on hand). You could also add garlic powder or any other seasoning you like.
Fill up the inner pot with HOT water so the Ultra doesn’t have to spend its time heating up cold water. I filled mine up about 2/3, then added in more hot water after I added the steak until it was around 3/4 full.
Set the Ultra to whatever temperature you want using the Ultra function and setting the custom temperature (I made a cheesy little video on how to set it). To figure out the temperature and time you need, there are all kinds of sous vide time and temperature charts out there, like this chart from SousVideSupreme.com.
Then comes the only “hard” part: getting the air out of the cooking bag! You want to suck as much air out as possible so the water can snuggle up right against the meat, all around it. It’s not a big deal: just dunk the bag into water (I just used what was already in the Ultra, but watch how hot the water is!) and let the water pressure do the work. I also just sucked some of it out with my ol’ lungs. Of course, if you have a vacuum sealer, this process is a lot easier, lol!
The only thing you have to make sure of is that the steak (or whatever you’re cooking) stays completely submerged. I usually do that just by clothespinning the bag to the rim of the inner pot in such a way that the rigidity of the bag keeps the steak down low in the water.
Now…go watch a show for an hour. Take a nap. Play with the kids, cats, or dogs. Read a book. Play a round or two of Battlefield 4. Or if you don’t have sides already prepared, you can do that.
And you don’t…have…to worry…about overcooking that steak!
The Fun Part: Reverse Searing
When at least the minimum time has elapsed according to the time and temperature chart, you’re ready to take that nomalicious steak out of its sous vide bath and sear it! This is technically called “reverse searing,” because in most cooking methods you sear meat before you cook it.
Get a pan – I prefer a cast iron skillet like this one made by Lodge – or a grill nice and hot. If you’re using a skillet like me, put a bit of high temperature oil in it when it’s hot, then add the steak. Swirl it around slowly in the skillet with a fork for about 45 seconds or so, but not much longer. Remember, it’s already cooked! You’re just finishing it. Then flip it over and slowly swirl it on the other side.
And you’re done! Stick it on a plate with some yummy sides like potato salad and backed beans, then dive in!
In all honesty, the steak I cooked sous vide in my Instant Pot Ultra was the darned best steak I’ve ever had, and I’ve had some good ones. It was also easy as pie to do! I’ll never cook another steak (or burger, or chicken breast) any other way.
Some Questions You May Have
Why the heck would I want to take that long to cook a steak (or burger, etc.)? I want fast and easy with my Instant Pot!
I believe in using the right tool for the job. If I want to whip up some mac & cheese or make a mouth-watering beef stew, or maybe the ever-yummy honey garlic chicken, the Instant Pot (and its standard cooking functions) is my best friend on the planet. But there simply is no better way to cook something like steak (or burgers, for that matter) and many other cuts of meat and other things than sous vide.
So when you need quick and easy, do quick and easy! But when you want something special like steak, treat yourself and do it right with sous vide!
Can I do sous vide cooking without an Instant Pot Ultra? What if I have a Duo or a Lux?
Absolutely! Heck, you can sous vide something in a cheap cooler using nothing more than water heated to the temperature you need and monitored with a thermometer. The Ultra just adds that capability onto all the other things other Instant Pots can do.

I have an Ultra, but can’t figure out how to set the Ultra custom temperature control!
No problemo! If you can stand to watch it, I made a quick cheesy video on how to do this. Click here to check it out.
I don’t like the idea of using plastic to cook my food. Are there any alternatives?

Now, for liquid-type things like yogurt, for example (yes, you can apparently cook yogurt sous vide!), you can use mason jars or other glass containers.
Thanks for the great information. I’m new to the instant pot ultra and sous vide. I’m excited to make steaks this way. Does each steak need its own bag? How many can you fit in the pot at the same time? And, can you share a pic of how you submerge with a clothespin? Thanks for any additional info you can share!
ReplyAimee – Yes, you should put each item you want to cook into its own separate bag. As for how many will fit in the pot, you just have to make sure there’s plenty of room for water between each item (don’t crowd them). As for keeping the bag submerged, the first thing is to make sure to get as much air out as possible. Then, if you need a bit more dunking than fiddling with clipping the bag along the lip of the pot provides, you can always clip something like a butter knife to the bottom of the bag to hold it down. It really doesn’t matter other than to keep that puppy underwater!
ReplyIs the trivet heavy enough to hold it down? Or maybe a small bowl on top of the trivet . . . Sounds like a great way to cook the meat.
ReplyI suppose you could, but the only caution would be that you don’t want the bag to sit on the bottom of the pot: it’ll pick up direct heat that way. You want it to be completely surrounded by water. Another way I’ve seen people do (and have done myself) is to use a wooden clothespin to clip a spoon or something to the bottom of the bag, and I think some folks have even stuck a spoon or whatever in the bag to hold it down. Again, though, you don’t want it actually sitting on the bottom. 😎
ReplyI don’t have the IP with ability to set the temperature so if I try sous vide, I’d have to use a circulating heater pump or something like that. 🙂 Thank you for the information.
I am trying to find a basic circulator without a heating element to use with the Ultra to get more consistent water temperature. Any suggestions?
ReplyI think I saw someone mention they had used a fish tank circulator for sous vide cooking, but beyond that I couldn’t say, really. To be honest, I doubt you’d really need it – I certainly haven’t, lol! 😎
ReplyThanks for your instructions! I’ve got two steaks in my Ultra right now so fingers crossed! I set things up according to your instructions and set my timer for 1 hour for my 1 inch steaks. I have a question about the timer. You said you can keep the steaks in the water for several extra hours since they won’t over cook. But does that mean I should set my timer for maybe 3 hours if I’m not going to get to my steaks right away? Otherwise doesn’t the Ultra turn off after an hour and then my steaks could be cool before I get them out to sear them? Thanks for any advice!!
ReplyDebra – Well, I wouldn’t keep anything “for several extra hours,” but an hour or even two is certainly fine. But I wouldn’t, say, get the steaks going at noon with the intention of eating them for dinner. What I normally do is set the time and temp I want (I use the app for the Joule sous vide wand), then make sure it cooks at LEAST that long. I typically plan to pull the steaks out 30 minutes or so after the recommended cooking time. 😎
ReplyOnce the steaks come to temperature, they will actually start tenderizing. A steak at 3 or 4 hours will be more tender. For steaks it is recommended that 4 hours be the max or it could start feeling mushy.
ReplyRoasts are often done overnight or even over days. I did ribs for 12 hours and they were fabulous!
Sandy – Yep! Although it’s hard to imagine how a steak cooked much longer than the recommended time could be more tender – they’re already amazing! 😎
ReplyLid on or off?
ReplyEither is fine. Technically, the theory goes that keeping the lid on might lead to a more stable temperature, but I’ve cooked sous vide just fine without. Also, if you use the lid that came with the IP, rather than the glass lid, don’t lock it on. But again, you really don’t need it.
ReplyThe only problem I have with Sous vide cooking in the Ultra is that the timer is limited to six hours. Why would one need more than 6 hours, you might ask? Well, to make a beautifully cooked top sirloin roast, (say 3-4 pounds) it needs to be cooked the Sous vide method for 14 hours at 131 degrees. So, for now, I set mine for 6 hours and then again for six hours, and then 2 hours. But it sure would be nice if the timing function did not have any limitations.
ReplyKat – That’s certainly a good point! The Ultra obviously has some limitations when it comes to sous vide cooking (the other big gripes being that the temperature is only +/- 5F and there’s no circulator), but for more “basic” – for lack of a better term – cooking like for steaks, chicken, and pork chops, etc., it’s a nice extra feature. I bought it primarily because I wanted a second pot and wanted the ability to do sous vide without buying a separate circulator, but if I found myself wanting to do roasts and longer-cooking items, I’d take the plunge and get one. 😊
ReplyI just got my Ultra in March and my ‘Ultra’ mode can be set for up to 99 hours, and the temperature can be set in one-degree increments… Maybe there’s been a firmware upgrade or maybe I’m missing something you guys are discussing.
I wish I could say they also added a circulator via firmware!
ReplyThe Ultra setting is what you use for sous vide cooking! Just set the temp for what you want for doneness, then set the timer so you have plenty of time. I usually just set it at least half an hour longer than I’m planning to cook, then use a separate timer to actually keep track of the time. 😎
ReplyMy ultra lets me go over 6 hours if I first set the pressure temp to ‘none’ then it lets me go higher on timer! I just set my bottom round roast to 30 hrs…
ReplyDo you do it with the lid on or off? I tested my Instant Pot Ultra and when I set the temp it was off compared to two digital thermometers I used to check the temp. It was a full 12 F lower than the set temp, but I also kept the lid off. Anyone else notice this?
PS to get all the air out, make sure to submerge the bag almost fully before you completely seal it.
ReplyGreat site! You and a few others have better and more complete information than the Instant Pot site. Are you supposed to use the lid when you use the Ultra in the “ultra mode or program” to cook sous vide to get the right temperature? I’m getting very different temperatures with and without the lid on. Have you actually used a good thermometer to measure how accurately the Ultra is keeping the desired water temperature? I’m using a Thermapen for these tests. I just got my Ultra this past Sunday, so I’m just getting used to it. I did a lot of experimenting setting the temperature “High” or 208 degrees, “Medium” or 197 degrees, “Low” or 131 degrees, and a few “custom” settings. At first, it didn’t occur to me to put the lid on, so I was doing ever test with the lid off. I used about 3 inches of water. I was getting 190 degrees instead of 208, 180 degrees instead of 197, and around 121 degrees instead of 131. With custom setting of 150 degrees I got 143. With custom setting of 175 I got 162 degrees. With custom setting of 105 it started “cooking” at 88 degrees and gradually increased to 98 degrees. Then, it occurred to me to put the lid on, and I tested 150 degrees and got 146, and at 175 I got 176. I haven’t done other tests at different temperatures with the lid on. At first, I was wondering if my machine wasn’t working right and wasn’t heating up enough, but I don’t know if my results are typical, without and with the lid on. It looks like I will need to keep my thermometer next to the pot in order to find the right custom temperature setting if I want to experiment with sous vide! Thank you.
Reply